




Handle every order from one screen
Confirmation calls, call-back reminders, fraud checks, courier booking, exchanges and courier payouts — all the daily work of a Bangladeshi COD business in one place. Below, every feature is shown step by step with screenshots.
🧭 Order Desk — at a glance
Order Desk is the one place to handle all your orders. No more jumping between separate WooCommerce pages — viewing orders, calling customers, changing status, sending to courier and printing all happen from one screen. The page has three main parts.
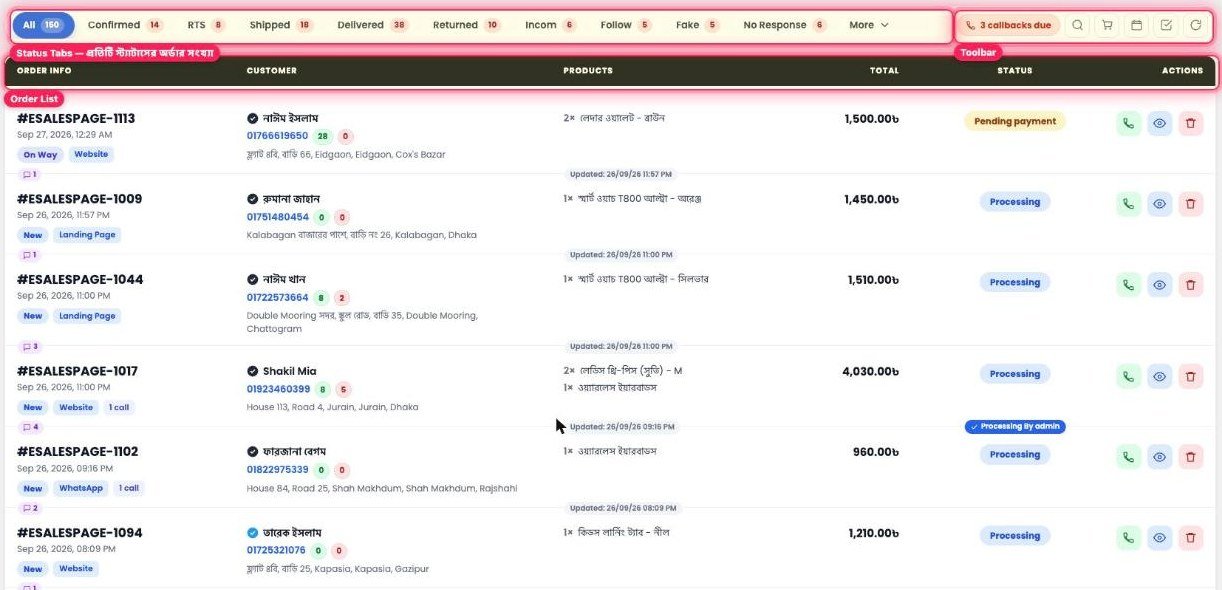
- 1Status Tabs The row at the top left. Each tab shows, in a red number, how many orders are in that status. Click one to see only those orders.
- 2Toolbar The buttons at the top right — call-back reminders, search, new order, date filter, select many orders at once, and refresh.
- 3Order List The table below shows each order in one row — Order Info, Customer, Products, Total, Status and Actions. One glance at a row tells you where the order stands.
⚙️ How it works
- Click Order Desk in the left menu of your WordPress dashboard.
- The All tab opens first, showing every order from newest to oldest.
- Each page shows 30 orders — use the ‹ › buttons at the bottom to move to the next page.
🗂️ Status Tabs & the More menu
Each order’s stage is sorted into its own tab. On top of WooCommerce’s own statuses, a few extra statuses that a Bangladeshi COD business needs have been added.
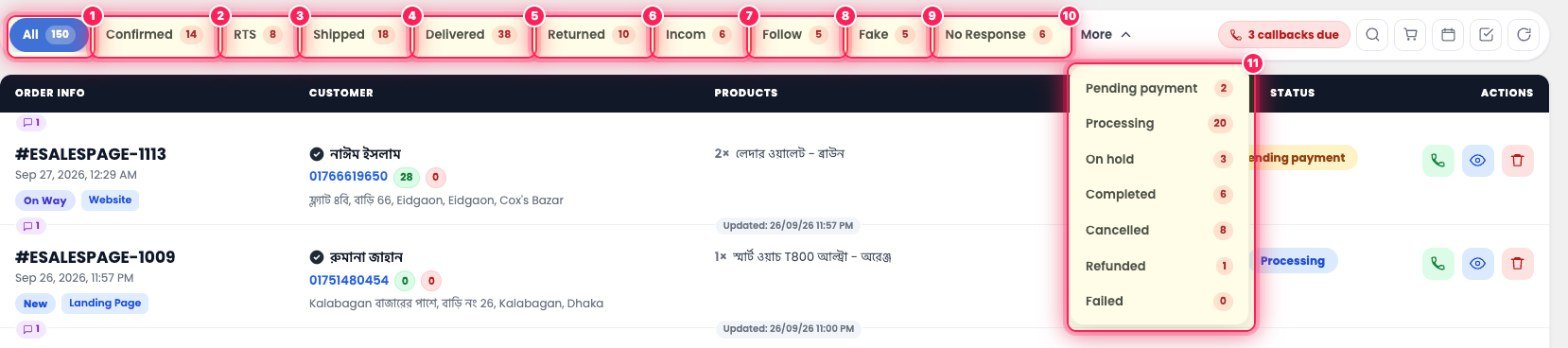
- 1All Every order together. The number next to it is the total.
- 2Confirmed Orders confirmed after talking to the customer.
- 3RTS (Ready to Ship) Packed and ready to hand to the courier.
- 4Shipped Handed over to the courier and on the way.
- 5Delivered The customer received the parcel.
- 6Returned The customer didn’t take it and the parcel came back.
- 7Incom (Incomplete) The customer started filling in the checkout form but didn’t finish — you can call them and recover the order.
- 8Follow (Following) Orders that need a follow-up, e.g. the customer said they’d let you know later.
- 9Fake Fake or prank orders. Keeping them separate keeps your real numbers clean.
- 10No Response You called but couldn’t reach the customer.
- 11More The other 7 WooCommerce statuses — Pending payment, Processing, On hold, Completed, Cancelled, Refunded, Failed. The ones you use less are tucked away here so the top row doesn’t get crowded.
⚙️ How it works
- Click any tab — the list changes instantly, with no page reload.
- When you change an order’s status, the tab counts update on their own.
- Click More to open a dropdown and pick one of the other statuses.
🧰 Toolbar — the buttons at top right
The small icons look simple, but each one does something different. Match them by number.

- 1callbacks due The number of customers it’s now time to call back. Explained in detail further down.
- 2Search orders Opens the search box. Search by order number, customer name or phone number.
- 3Create a new order Opens a form to enter orders that came in by phone, WhatsApp or Facebook.
- 4Filter by date Opens a bar to view orders by date — Today, Last 7 days, Custom range and more.
- 5Select orders Adds a checkbox next to each row so you can work on many orders at once (Bulk action).
- 6Refresh Reloads the list without reloading the page — you’ll see updates if someone else changed an order.
⚙️ How it works
- Hover over any icon to see a short label of what the button does.
- Click the same button again to close the part it opened.
📞 Callbacks due — call-back reminders
Customers often say “call me later”. Written on paper, it’s easy to forget. Order Desk remembers who to call and when, and tells you when it’s time.
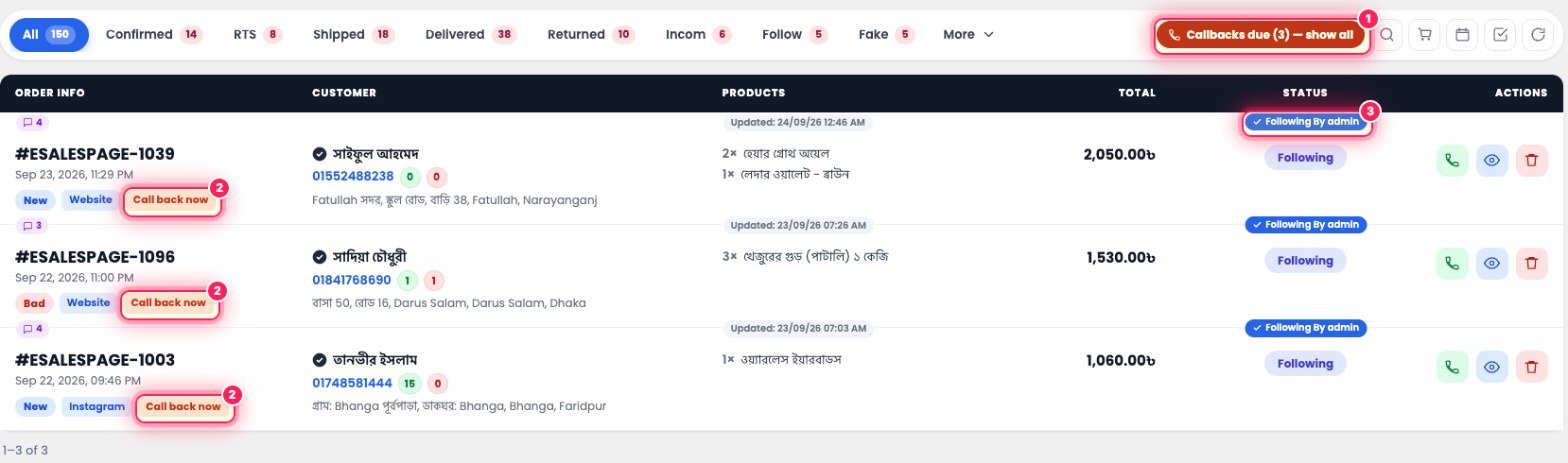
- 1Callbacks due (3) — show all When this button is red, some customers are past their call-back time. Click it to see only their orders. Click again to go back to all orders.
- 2Call back now A red label next to an order whose call-back time has arrived. If it’s not time yet, it shows something like Call back 11:17 pm.
- 3Following By admin Also shows who changed the status — useful in a team to see who picked up which order.
⚙️ How it works
- Open the order with 👁 View and go to the Calls section.
- Pick a time from the Call back… dropdown — In 30 minutes, In 1 hour, In 3 hours, This evening 6 PM, Tomorrow 10 AM, or your own time with Pick a time….
- Click Set. The call-back time will show on the order’s row.
- When the time comes, the count on the top button goes up and Call back now turns red on the order.
🔎 Search — finding an order
Find one specific order among thousands in a few seconds.
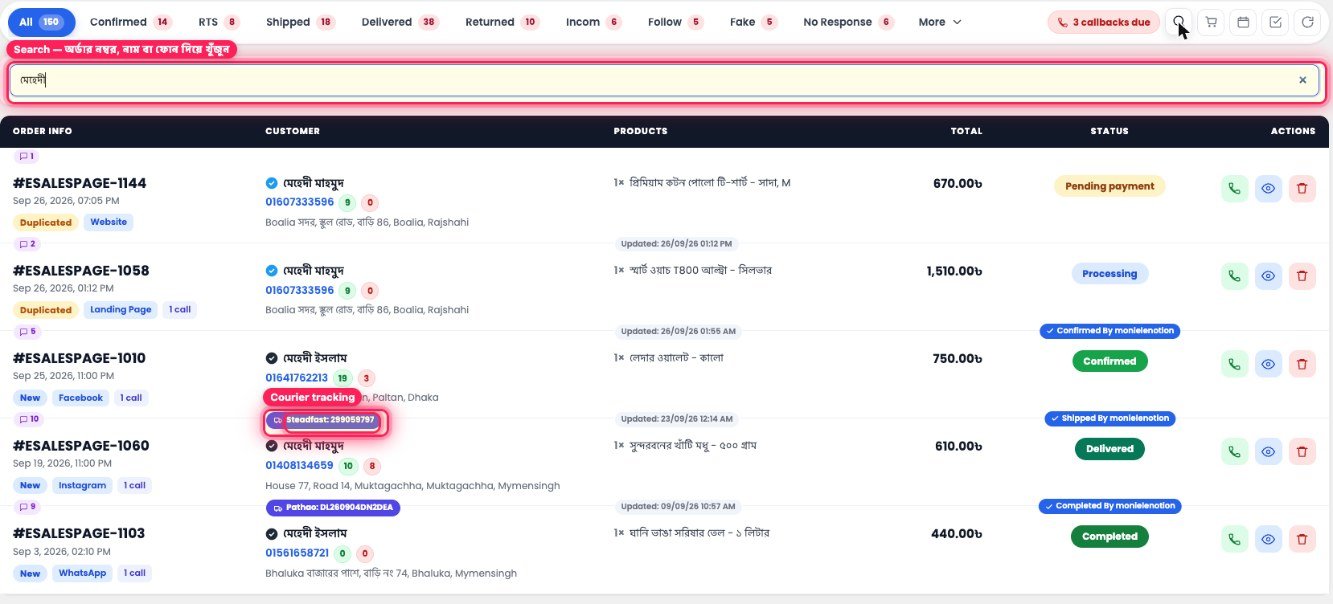
- 1Search box Type an order number (e.g. 1148), customer name (Bangla or English) or phone number. Results appear as you type — no need to press Enter.
- 2Courier tracking For orders booked with a courier, the courier name and Consignment ID show above the customer name — e.g. Steadfast: 299059797 or Pathao: DL2609…. If a customer asks about their parcel, you can give them the number right from here.
⚙️ How it works
- Click the 🔍 icon in the Toolbar.
- Type a name, phone or order number.
- When you’re done, click the ✕ on the right of the box to see all orders again.
📅 Filter by date & Print Today Parcel
See orders from a specific day or period, and print today’s parcels together.
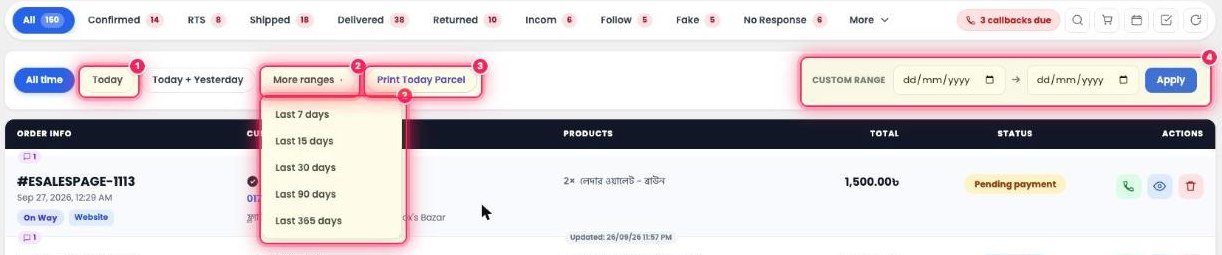
- 1Today Only today’s orders. Next to it are All time and Today + Yesterday.
- 2More ranges Last 7 days, Last 15 days, Last 30 days, Last 90 days, Last 365 days।
- 3Print Today Parcel Shows the orders marked Shipped today, so you can print them together and stick them on the parcels.
- 4Custom range + Apply Pick your own start and end date and click Apply.
☑️ Select orders — work on many orders at once (Bulk action)
Sending 50 orders to the courier one by one takes ages. Select them and finish in one go.
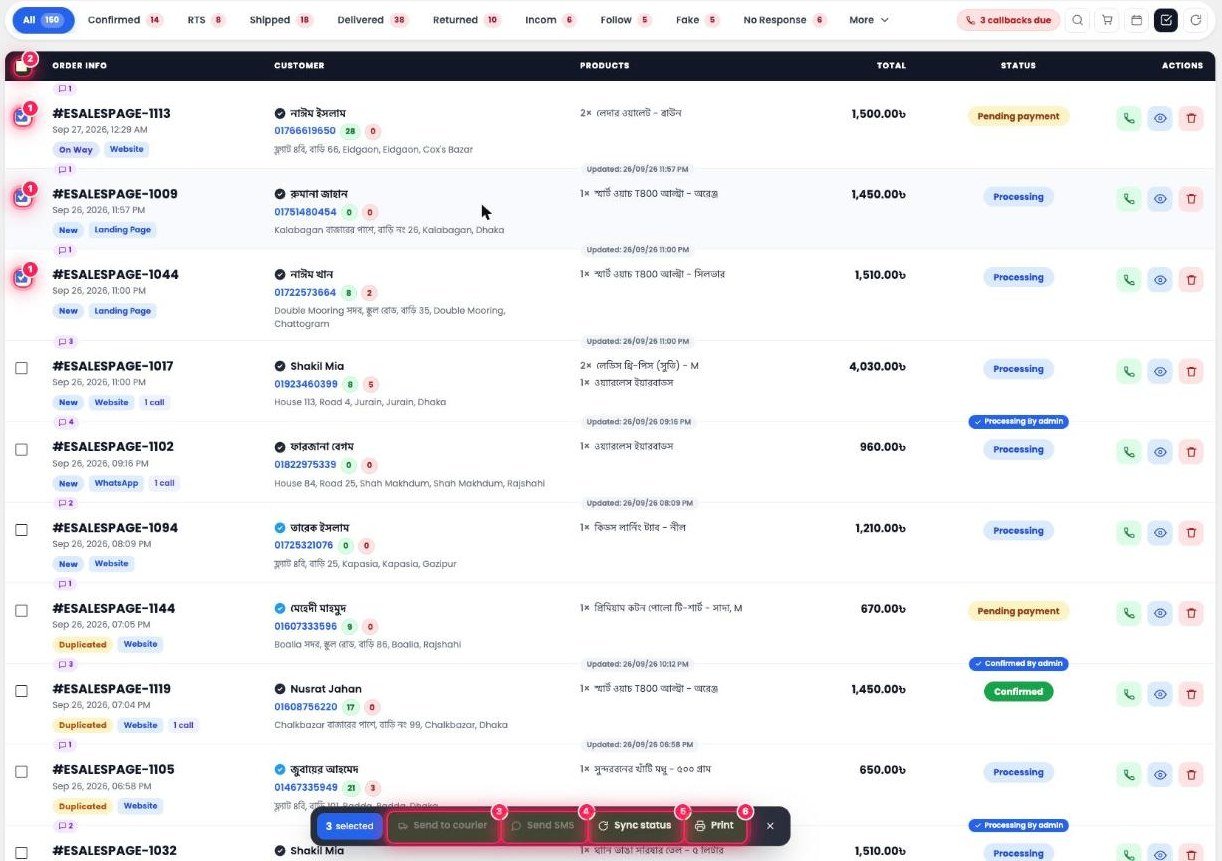
- 1Checkbox Tick the box on the left of each order to select it.
- 2Select all The checkbox in the table header selects every order on this page.
- 3Send to courier Books all selected orders with the courier at once.
- 4Send SMS Sends an SMS to all selected customers at once.
- 5Sync status Pulls the latest status of all the parcels from the courier at once.
- 6Print Prints all selected orders together.
⚙️ How it works
- Click the ☑ icon in the Toolbar — the checkboxes appear.
- Select orders. A bar pops up at the bottom showing how many are selected (e.g. 3 selected).
- Click the action button. To cancel, click the ✕ on the bar.
➕ Create New Order — manual order entry
Enter orders from phone, WhatsApp, Facebook or Instagram without leaving this screen. For a returning customer, type the phone number and the rest fills in by itself.
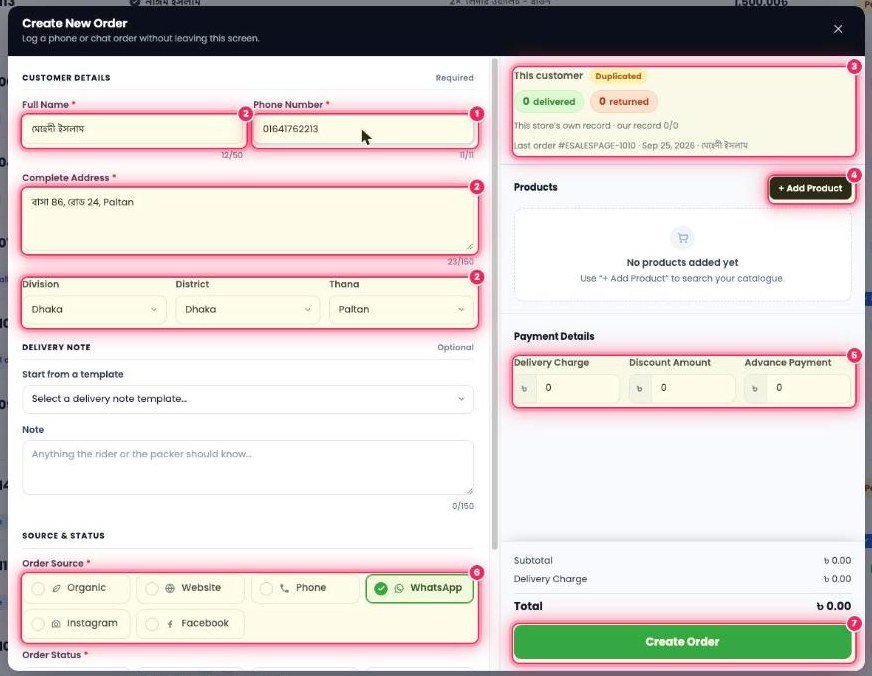
- 1Phone Number Enter the 11-digit number. If they’ve ordered before, a small notice appears below — Filled name, address and area from order #…
- 2Auto-filled fields Name, address, Division, District and Thana fill in from the previous order. Change them if needed. Each field shows how many characters you’ve typed (e.g. 12/50).
- 3This customer The customer’s record — label (e.g. Duplicated), how many times Delivered/Returned, and their last order.
- 4+ Add Product Opens the product search (see below).
- 5Payment Details Delivery Charge, Discount Amount and Advance Payment.
- 6Order Source Where the order came from — Organic, Website, Phone, WhatsApp, Instagram, Facebook. Later, reports show which channel is working.
- 7Create Order Check the Subtotal, Delivery Charge and Total below, then click it — the order shows up in the list right away.
⚙️ How it works
- Click the 🛒 icon in the Toolbar.
- Start with the phone number, then check the name and address.
- In Delivery Note, pick a template or write your own (up to 150 characters).
- Choose the Order Status — if it was already confirmed on the phone, you can set it straight to Confirmed.
- Add products and charges, then click Create Order.
🛍️ + Add Product — finding products
No need to dig through the whole catalog. Your best-selling products are right at the top.
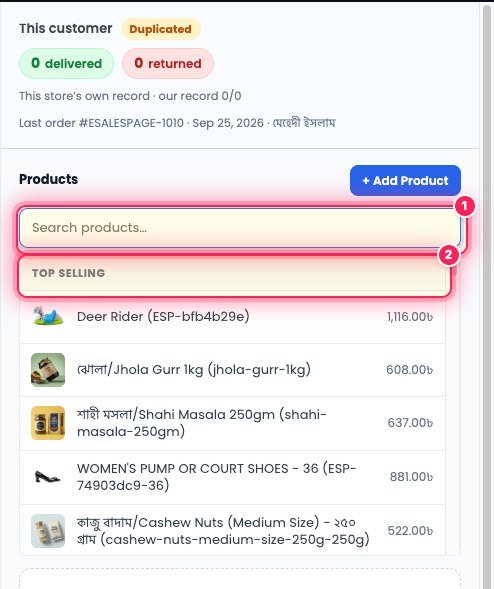
- 1Search products… Type a name or SKU and matching products appear instantly. Variations (size/color/weight) are listed separately.
- 2TOP SELLING Best-selling products with image and price — add them in one click. Scroll down to ALL PRODUCTS for everything else.
📋 Order List — what each row shows
Each order is one row. The six columns together give the full picture, so most of the time you don’t even need to open the order.

- 1Order Info Order number, date and time, plus some colored labels (explained in the next section).
- 2Customer Name, phone, delivery/return record and address.
- 3Products Which products and how many — e.g. 1× Wireless Earbuds. Size/color shows too if there are variations.
- 4Total The total amount to collect from the customer.
- 5Status The current status, with a small blue label above it showing who changed it (e.g. Processing By admin).
- 6Actions Three buttons — 📞 Call, 👁 View (order details), 🗑 Delete (moves it to the Bin).
🔬 Order Info & Customer columns in detail
The small labels and numbers carry a lot of information. Read them by number.
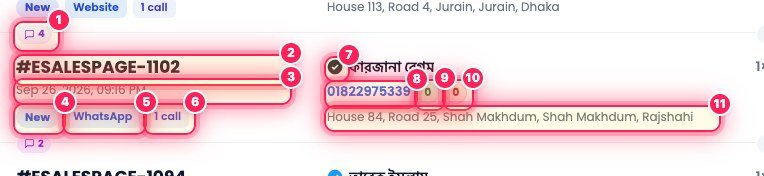
- 1💬 Notes How many comments/notes the order has. A high number means a lot of work or conversation has happened on it.
- 2Order number The order number, e.g. #ESALESPAGE-1102.
- 3Date & time When the order came in.
- 4Customer record A label for the customer behind this phone number — New (first order), Repeated (bought before), Duplicated (more orders from the same number — check if it’s a duplicate), Bad (has a history of returns/problems), On Way (another parcel for this customer is on the way right now).
- 5Source Where the order came from — Website, Landing Page, WhatsApp, Phone, Facebook, Instagram, Exchange and so on. Shows which channel brings the most orders.
- 6Call count How many calls were logged on this order, e.g. 1 call, 2 calls. Hover to see the last call’s result too (Answered / No answer).
- 7OTP tick The tick next to the name. Blue tick = the customer verified their phone number with an SMS code. Black tick = not verified.
- 8Phone The phone number in blue — click to call directly.
- 9Delivered (green number) How many parcels the customer has received in total. With Fraud check on, it counts across all couriers plus your shop; without it, only your shop’s record.
- 10Returned (red number) How many parcels they returned. If this is high, be careful before shipping.
- 11Address The customer’s full address, including thana and district.
🔁 Exchange orders & call-back labels
If a customer wants a different size or product after delivery, you don’t need to write a new order — an Exchange order is created from the original, and the two orders stay linked.
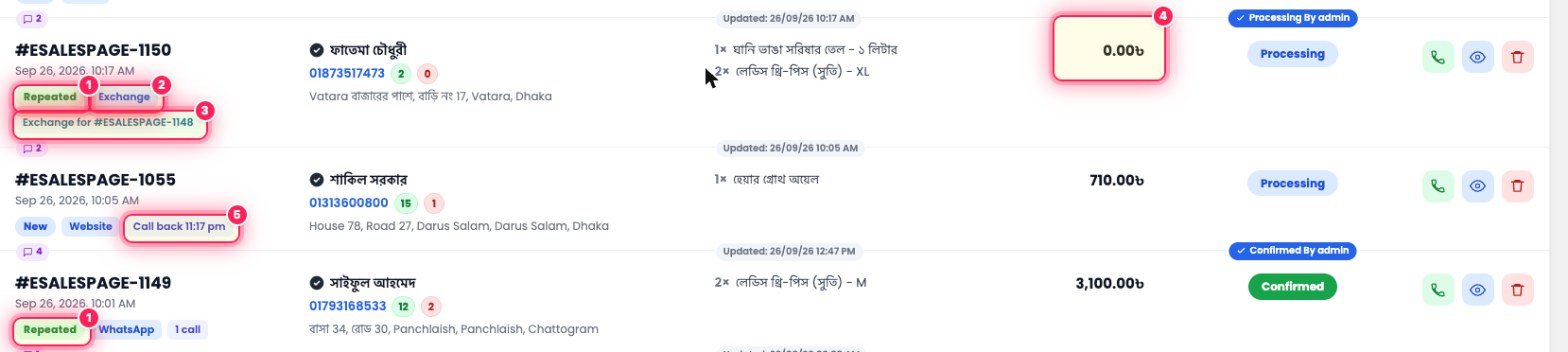
- 1Repeated This customer has bought before.
- 2Exchange Exchange as the Source means this order replaces an earlier one.
- 3Exchange for #ESALESPAGE-1148 Shows which order this one replaces. The original order gets an Exchanged label.
- 40.00৳ For a free exchange the Total stays zero, so the courier won’t collect any money from the customer.
- 5Call back 11:17 pm A call-back is set, but its time hasn’t come yet.
⚙️ How it works
- Open the Delivered order with 👁 View.
- In the Returns & exchange section, click Create exchange order.
- A new order is created with Source = Exchange, and a link is written in the comments of both orders.
🪟 Opening an order — the top part & Customer Information
Click the 👁 View button on any order and a panel slides in from the right. The list behind it stays exactly as it was, so when you’re done, click ✕ and you’re back where you were.
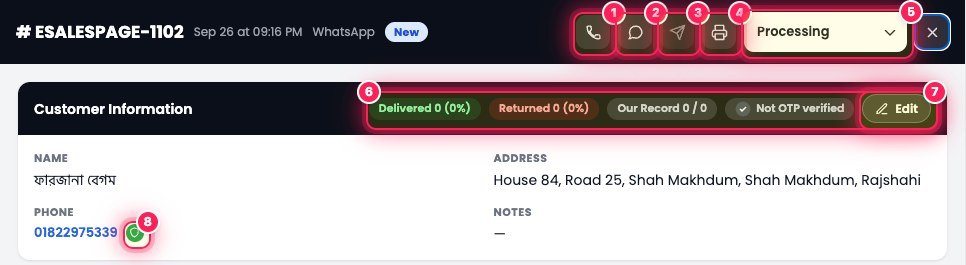
- 1Call Button to call the customer.
- 2WhatsApp Opens the customer’s WhatsApp chat with your confirmation message already typed — just press Send.
- 3SMS Button to send the customer an SMS. If no SMS gateway is set up, clicking it shows you how to set one up.
- 4Print Prints the order (invoice/parcel slip).
- 5Status dropdown Change the order status right here — all 16 statuses, including Confirmed, Ready to Ship, Shipped, Delivered, Returned, Incomplete, Following, Fake and No Response.
- 6Record badgesDelivered and Returned (count and percentage), Our Record (your shop only), and OTP verified / Not OTP verified.
- 7Edit Opens a form to change the customer’s name, phone, address, area and notes.
- 8Trust shield The small shield next to the phone number — its color shows how safe the customer’s record is (green means safe).
✏️ Edit — correcting customer details
If the customer gave a wrong address or tells you a new one on the phone, fix it right from the order.
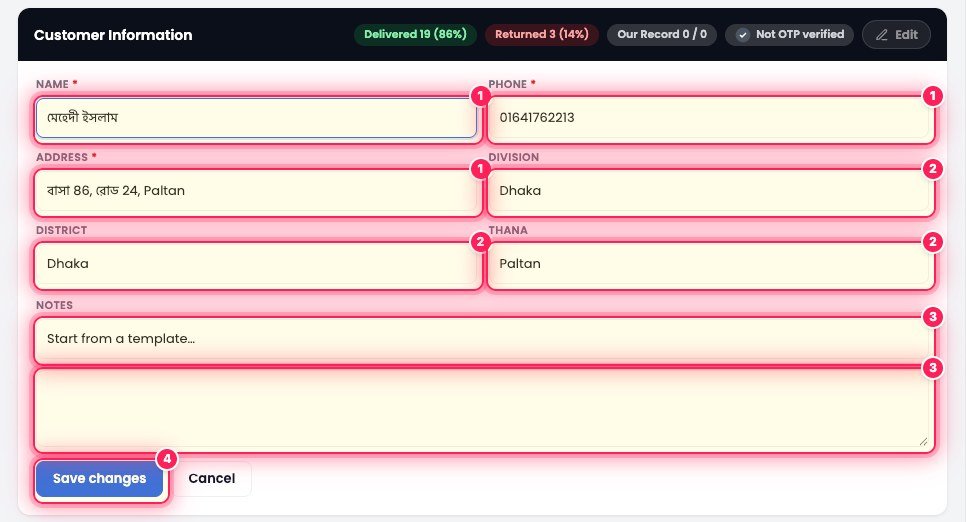
- 1Name, Phone, Address All three are required (*). Changing them here updates the order too.
- 2Division → District → Thana Choose the division first, then only that division’s districts appear, then that district’s thanas. The right area goes to the courier booking, so fewer deliveries go wrong.
- 3Notes Delivery note. Pick a ready-made note from Start from a template… — Office hours only, Call before delivery, Let the customer check, Urgent — deliver today — or write your own in the box below.
- 4Save changes Save. Changed your mind? Cancel.
☎️ Calls & SMS history
After calling a customer, log what happened in one click. Anyone who opens the order later will know what was said before.
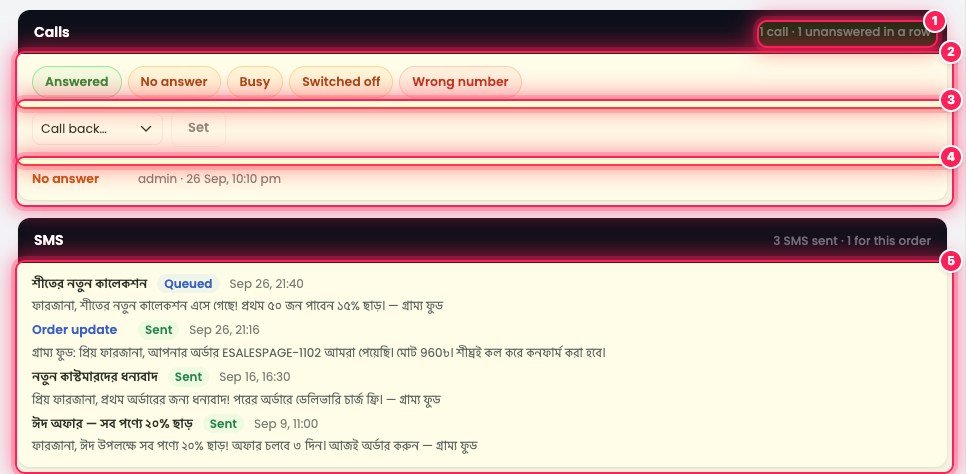
- 1Call summary Total calls made and how many in a row went unanswered — e.g. 1 call · 1 unanswered in a row.
- 2Call result buttons Pick the result after the call — Answered, No answer, Busy, Switched off, Wrong number. It’s saved to the log instantly and the row’s call count goes up.
- 3Call back… + Set If the customer asks you to call later, pick a time and click Set. Order Desk will remind you when it’s time.
- 4Call log A list of who called, when, and the result — e.g. No answer · admin · 26 Sep, 10:10 pm.
- 5SMS Every SMS sent to this customer — both order updates and marketing. Shows each one’s status (Queued / Sent) and time. At the top it shows the total and how many were for this order.
⚙️ How it works
- Call using the Call button.
- After the call, click the result button.
- If the customer agrees, set Confirmed from the Status dropdown at the top. If they don’t pick up, mark No answer and try again later.
📱 Browser Phone — call from the browser & call recordings
No more picking up your own mobile or copying numbers for confirmation calls. The call goes out from your computer while the order is open, the conversation is recorded, and the result is saved with the order — no more arguing later about “what did the customer say?”
Step 1 — Calling (Ringing)
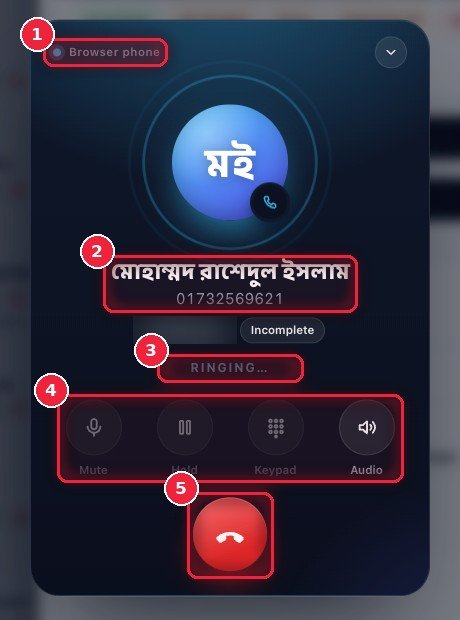
- 1Browser phone The call goes out from your browser — no separate phone or SIM needed. The blue dot means it’s waiting to connect.
- 2Customer name and number Pulled in from the order automatically, no typing — no risk of calling the wrong number. Below, it shows the order number and current status (e.g. Incomplete), so it’s clear which order you’re talking about.
- 3RINGING… It’s ringing on the other end. The screen changes as soon as the customer picks up.
- 4Mute · Hold · Keypad · Audio Four handy controls during the call. Use Keypad to press numbers in an IVR, and Audio for sound settings.
- 5Red button Hang up.
Step 2 — Talking, and it’s recording
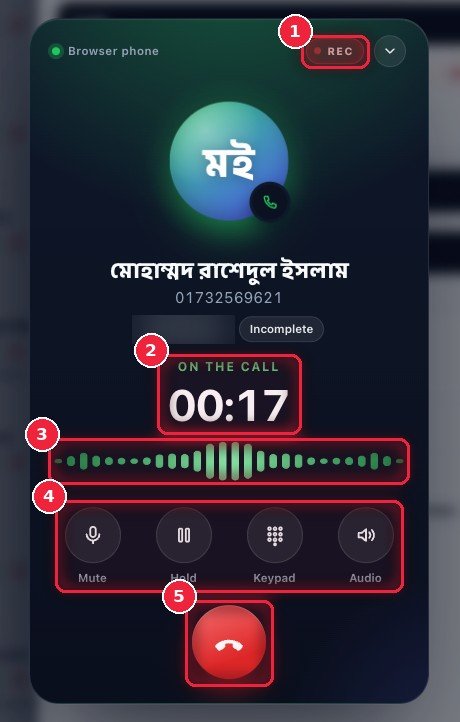
- 1REC Recording starts as soon as the call is answered — nothing extra to press. The red REC means it’s recording.
- 2ON THE CALL + timer Shows live how long you’ve been talking.
- 3Voice wave Moving green lines mean sound is going both ways. If the customer says “I can’t hear you”, a glance here tells you whether your mic is working.
- 4Controls Use Hold mid-call to go check stock, or Mute to talk to someone next to you.
- 5End call Press the red button when you’re done — the result screen appears right away.
Step 3 — Call ended, result in one tap
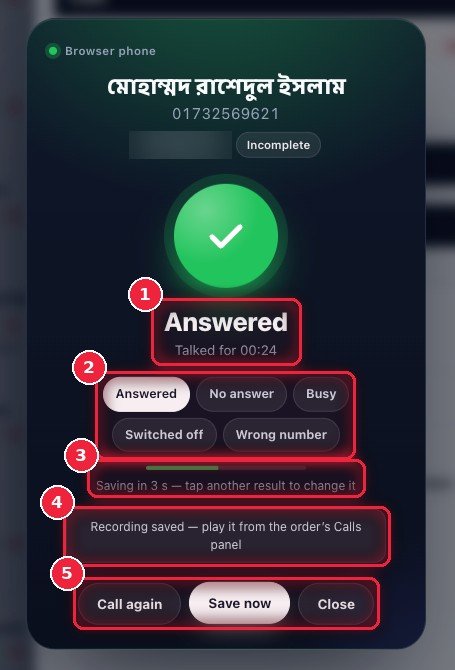
- 1Answered · Talked for Whether the customer picked up and how long you talked — filled in automatically.
- 2Result buttonsAnswered, No answer, Busy, Switched off, Wrong number — the system pre-selects one; if it’s wrong, tap another.
- 3Saving in 3 s Saves itself after 3 seconds. Tap a different result before then and that one is saved instead — nothing to write down separately.
- 4Recording saved The call recording is stored in the order’s Calls panel (step 4 below).
- 5Call again · Save now · CloseCall again if the line dropped, Save now to save without waiting, and Close to close.
Step 4 — Call recordings and history inside the order
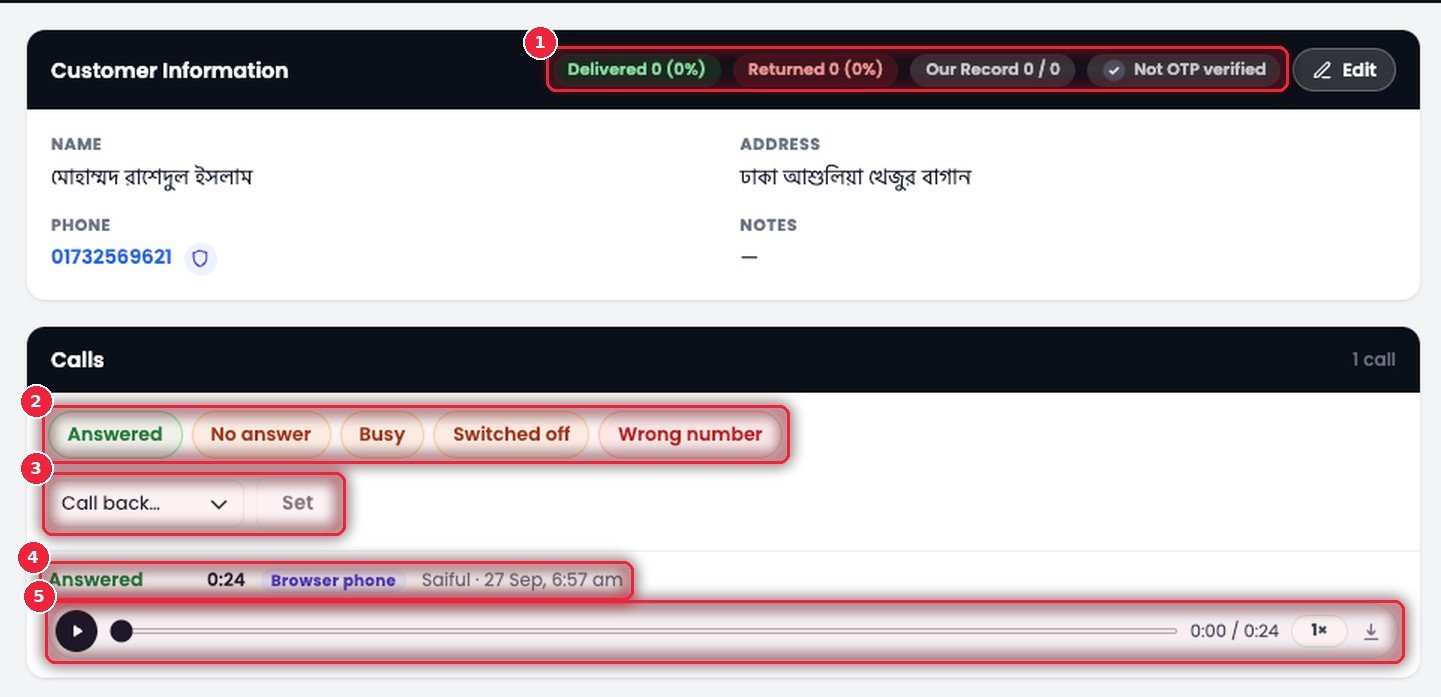
- 1Customer record Check before you call — how many deliveries/returns before, their record with your shop, and whether they’re OTP verified.
- 2Result buttons Even if you called from your mobile, you can log the result here by hand.
- 3Call back… If the customer says “call me later”, pick a time and click Set — a reminder shows up in Callbacks due at that time.
- 4Call log Each call’s result, how long you talked (0:24), where it was made from (Browser phone), who called and when — all on one line.
- 5Recording player Listen to the call inside the order. Tap 1× to speed it up, and use the icon on the right to download. Useful when a customer later says “I never ordered this”, or when you want to hear how a new staff member handles calls.
⚙️ How it works
- Open the order, or from a list row, click 📞 Call — the Browser phone opens in the corner of the screen.
- The first time, the browser asks for microphone permission — click Allow. Headphones give the clearest sound.
- When you’re done, press the red button and check the result — it saves in 3 seconds.
- Listen to the recording any time later from the order’s Calls panel.
🧾 Order Items & the money breakdown
Change the order’s products, quantities and charges right here — if the customer asks on the phone to add one more, you don’t need a new order.
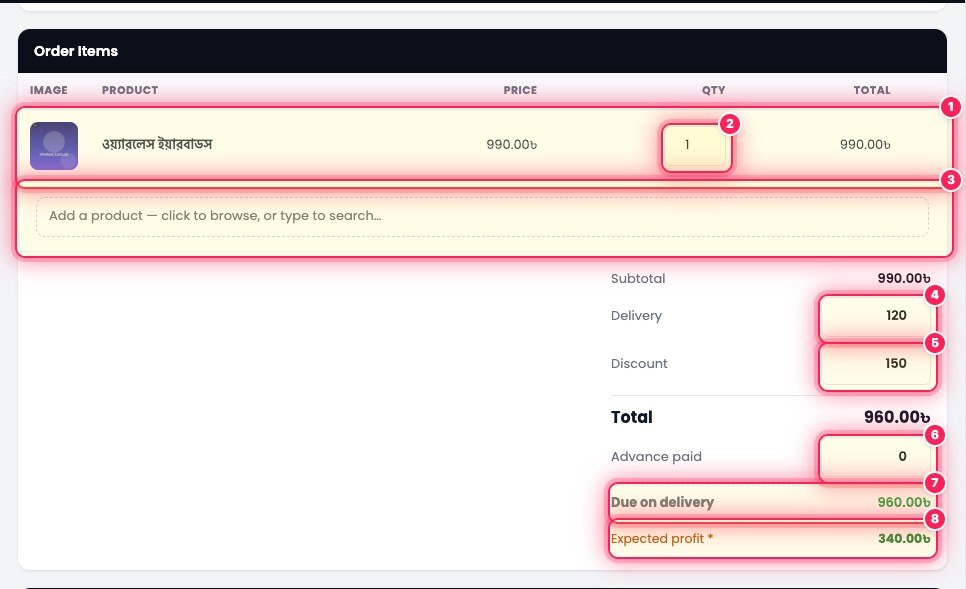
- 1Product row Image, name, price and total.
- 2QTY Change the quantity and the total updates by itself.
- 3Add a product Click or type a name to add a new product from the catalog.
- 4Delivery Delivery charge.
- 5Discount Enter any discount here — it’s taken off the Total.
- 6Advance paid If the customer paid something upfront via bKash/Nagad, enter it here.
- 7Due on delivery Total minus Advance — what the courier will collect (COD).
- 8Expected profit Estimated profit on this order = money received − product cost − courier charge − COD fee − packaging. Hover to see the full breakdown. Courier charges are set in eSP Theme → Profit.
🛡️ Courier & Delivery Analysis (Fraud check)
Know before you ship whether the customer is likely to accept the parcel. It checks this phone number’s delivery record across Bangladesh’s major couriers and gives a Trust score.
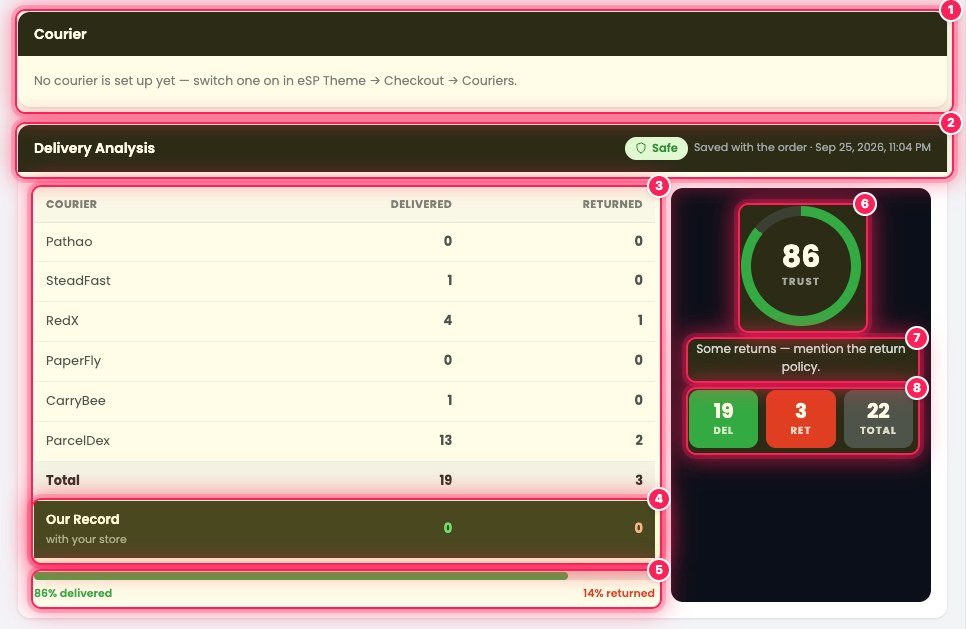
- 1Courier Which courier this order is booked with. If no courier is enabled, it tells you where to turn one on — eSP Theme → Checkout → Couriers.
- 2Safe / Saved with the order The record was checked when the order came in and saved with it, along with a result label (e.g. Safe).
- 3Courier table Pathao, SteadFast, RedX, PaperFly, CarryBee, ParcelDex — how many Delivered and how many Returned on this number at each courier.
- 4Our Record How many times this customer accepted/returned parcels from your shop only.
- 5Progress bar Overall delivery and return percentage.
- 6TRUST score A number from 0 to 100. The higher, the safer.
- 7Verdict Advice in plain words — e.g. Excellent record — safe to ship, Some returns — mention the return policy, or No delivery history yet — treat as a new customer.
- 8DEL / RET / TOTAL Total deliveries, returns and parcels.
⚙️ How it works
- Turn on a provider in eSP Theme → Checkout → Fraud check.
- After that, every new order is checked automatically.
- If the Trust score is low, call and confirm carefully, or take an advance.
🚚 Returns & exchange and Courier tracking
Orders booked with a courier have a fixed bar at the bottom of the panel showing the parcel’s latest status.
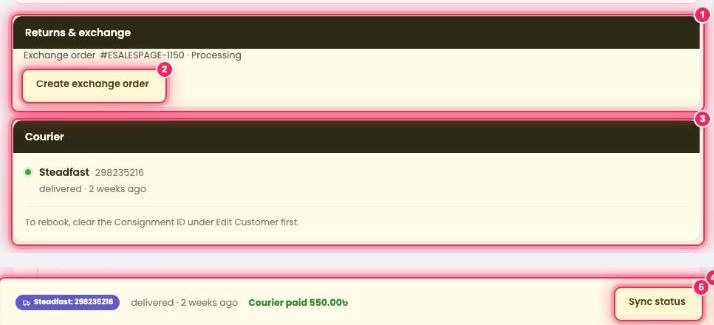
- 1Returns & exchange If this order has an exchange order, its number and status show here.
- 2Create exchange order Creates a replacement order in one click.
- 3Courier card Courier name, Consignment ID and status — e.g. Steadfast 298235216 · delivered · 2 weeks ago.
- 4Courier bar The bottom bar shows the tracking number, status and whether the courier has paid (Courier paid 550.00৳).
- 5Sync status Pulls the latest status from the courier, so the order updates itself when it’s Delivered/Returned.
🕒 Status History & Comments
A full record of who did what on the order, and when. Very useful when several people work in a team.
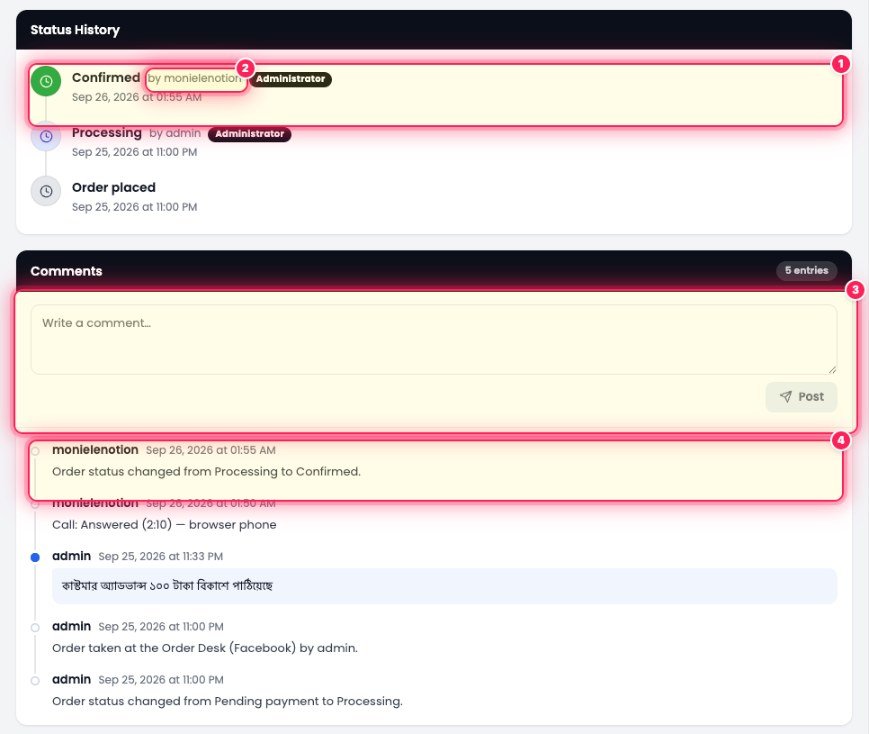
- 1Status History When each status change happened and who made it — newest at the top.
- 2by monielenotion · Administrator The name and role of the user who changed it. Automatic changes show System.
- 3Write a comment + Post Write any note about the order and click Post — e.g. “Customer sent 100 taka advance via bKash”. Up to 2000 characters.
- 4Comment list Alongside your notes, the system keeps its own log — status changes, call results and times, courier payments, exchanges and more.
💰 Courier payouts — tracking courier money
The Courier payouts page sits under the Order Desk menu. It finds orders the courier hasn’t paid for, underpaid, or charged too much on — no more matching things up in Excel.
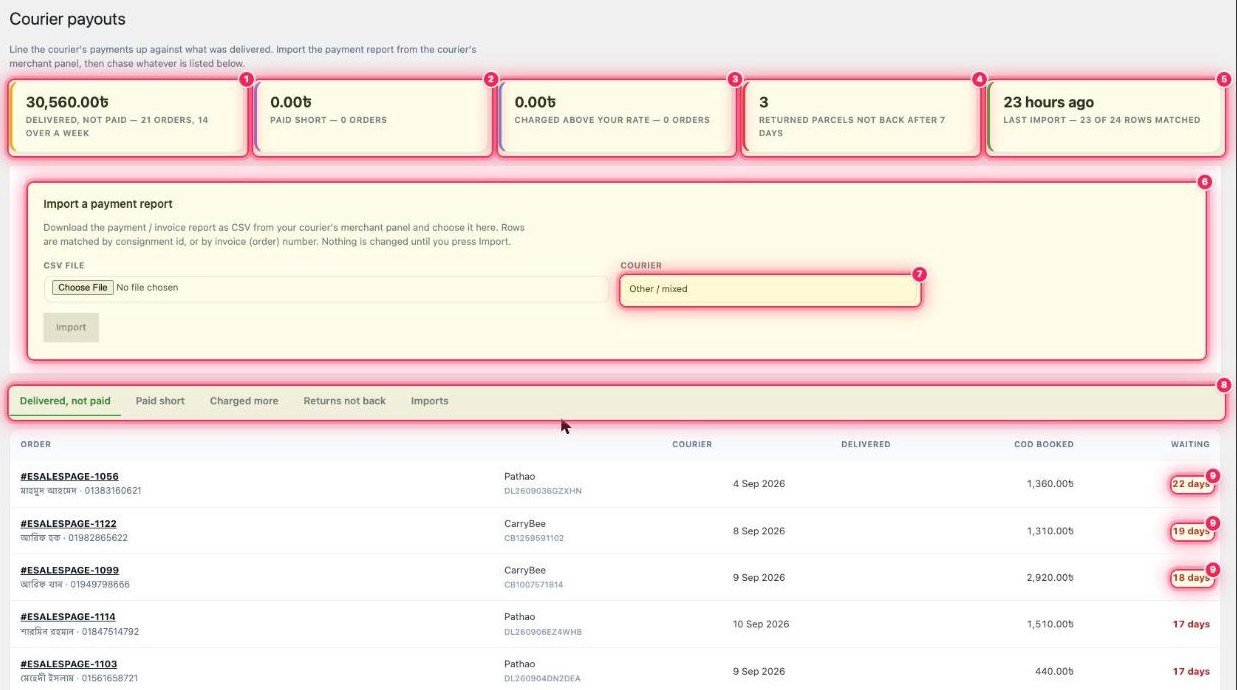
- 1Delivered, not paid Delivered, but the courier hasn’t paid yet — total amount and number of orders, and how many are over a week old.
- 2Paid short Orders where the courier paid less than it should have collected.
- 3Charged above your rate Orders where the courier deducted a higher delivery charge than your set rate.
- 4Returned parcels not back More than 7 days have passed, but the returned parcel still isn’t back in your hands.
- 5Last import When you last imported a report and how many lines matched orders.
- 6Import a payment report Download the payment/invoice report as CSV from the courier’s Merchant Panel and upload it here. Lines are matched to orders by Consignment ID or order number. Nothing changes until you click Import.
- 7Courier Choose which courier the report is from (or Other / mixed).
- 8TabsDelivered, not paid, Paid short, Charged more, Returns not back and Imports (a list of past imports).
- 9Waiting How many days the money has been outstanding. Ask the courier about the big red numbers first.
⚙️ How it works
- Download the payment report CSV from the courier’s Merchant Panel.
- Choose the file with Choose File, pick the courier, and click Import.
- Matched orders get the payment details, and a note is added to the order’s comments (collected, delivery charge, COD fee).
- Whatever is left shows in the tabs — take those up with the courier.