


Product on one page, order on the same page
Don’t lose customers from your Facebook ads by sending them through the shop, cart and checkout. eFunnel gives each product its own landing page with the order form right below — and you set offers, order bumps, scratch cards and separate pixels for that form all in one place.
🧭 All funnels and their results
Open eFunnel → All funnels and you’ll see how all your funnels are doing together at the top, with search and filters below.
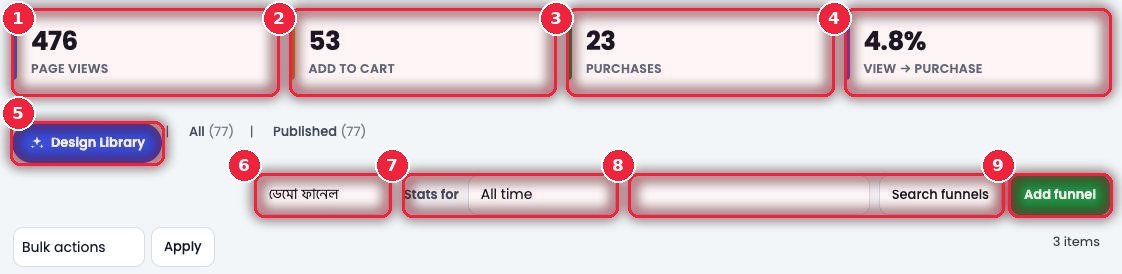
- 1Page views How many times funnel pages were viewed.
- 2Add to cart How many times someone picked a product and moved toward ordering.
- 3Purchases How many orders came in.
- 4View → purchase What % of people who viewed actually bought — the simplest measure of how a funnel is doing.
- 5Design Library Start a new funnel or section from a ready design (section 13 below).
- 6Category Filter funnels by category — e.g. Eid offer, demo.
- 7Stats for Today, 7/30/90 days, all time or your own dates — the top numbers and table numbers change with this period.
- 8Search funnels Search by name.
- 9Add funnel Create a new funnel.
📋 The funnel list — what each row shows
Each funnel’s product, link and its own numbers on one row. The list alone tells you which ones are working and which should be paused.
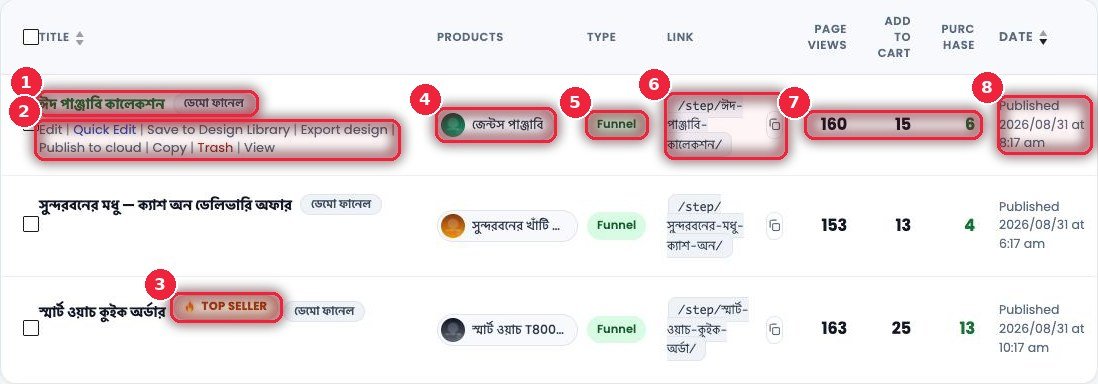
- 1Name and category The funnel name, with its category tag next to it.
- 2Action links On hover: Edit, Quick Edit, Save to Design Library (keep the whole page as a design), Export design (download as a file), Publish to cloud (to use on another site), Copy (make an exact duplicate), Trash, View.
- 3TOP SELLER The funnel with the most sales in this period is marked with this badge.
- 4Products Which product it sells.
- 5Type The page type.
- 6Link The funnel’s address (/step/…) — copy it in one click with the button next to it, to put in your ad.
- 7Page views · Add to cart · Purchase This funnel’s own numbers — a green number means orders came in.
- 8Date When it was published.
🛠️ Funnel editor
The familiar WordPress block editor — build the page with eSalesPage widgets, with all funnel settings on the right.
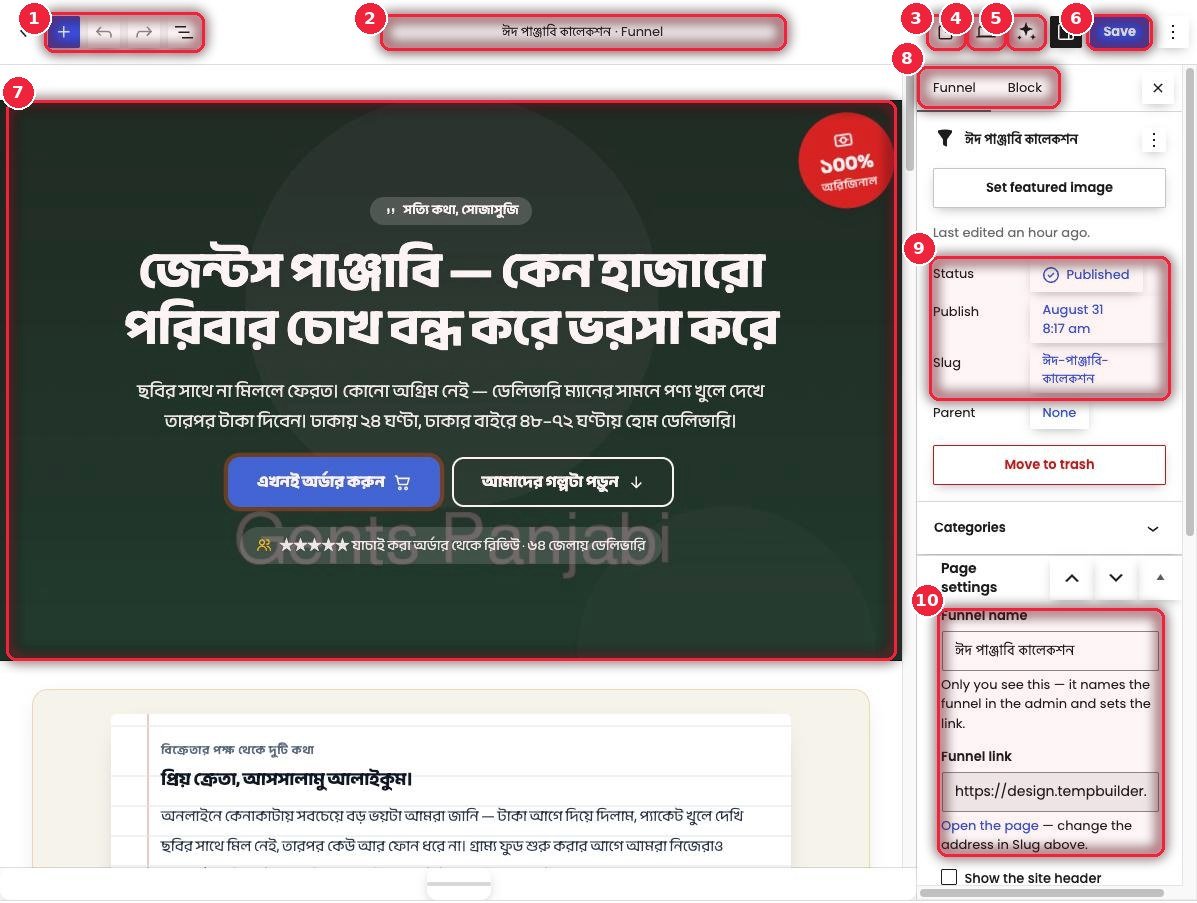
- 1Add block, Undo/Redo, list view Add widgets with +, undo mistakes, and see every part of the page in a list.
- 2Funnel name Which funnel you’re editing.
- 3View The live page in a new tab.
- 4Preview How it looks on desktop, tablet and mobile.
- 5Design Library Drop in a ready section or a full page in one click.
- 6Save Save.
- 7Page content You see what you’re building directly — click anywhere to change the text.
- 8Funnel · Block Funnel settings and settings for the selected block.
- 9Status · Slug Publish status, date, and address.
- 10Page settings Name, link and how the page looks (next section).
🎛️ Page settings — how the page looks
Each funnel has its own look — separate from the rest of the shop.
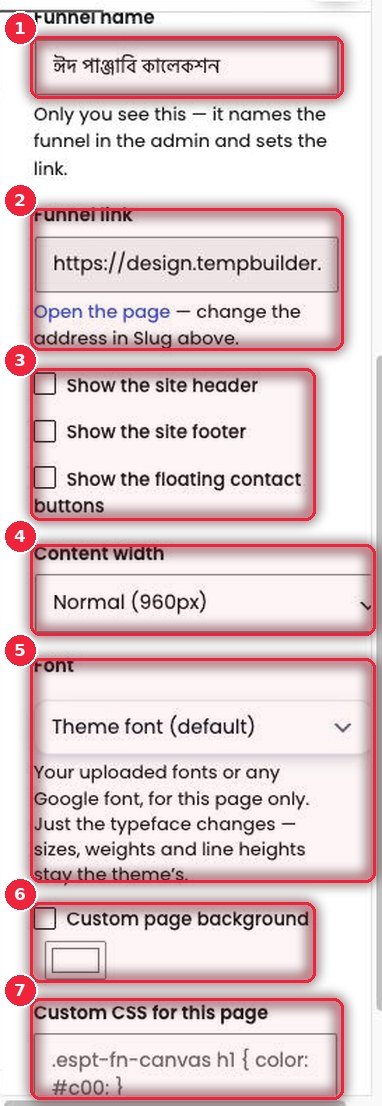
- 1Funnel name Only you see this — the admin name and link are created from it.
- 2Funnel link The full address; open it with Open the page.
- 3Header, footer, floating buttons Whether to show the site header/footer and the WhatsApp/call buttons. It’s usually best to keep them off so people from ads aren’t sent elsewhere.
- 4Content width Narrow (720px), Normal (960px), Wide (1200px) or Full width.
- 5Font An uploaded font or any Google font — for this page only.
- 6Custom page background The page’s own background color.
- 7Custom CSS Your own CSS for this page only, if needed.
🧾 The order form customers see
An order form is added automatically at the bottom of every funnel. Customers order without leaving the page.
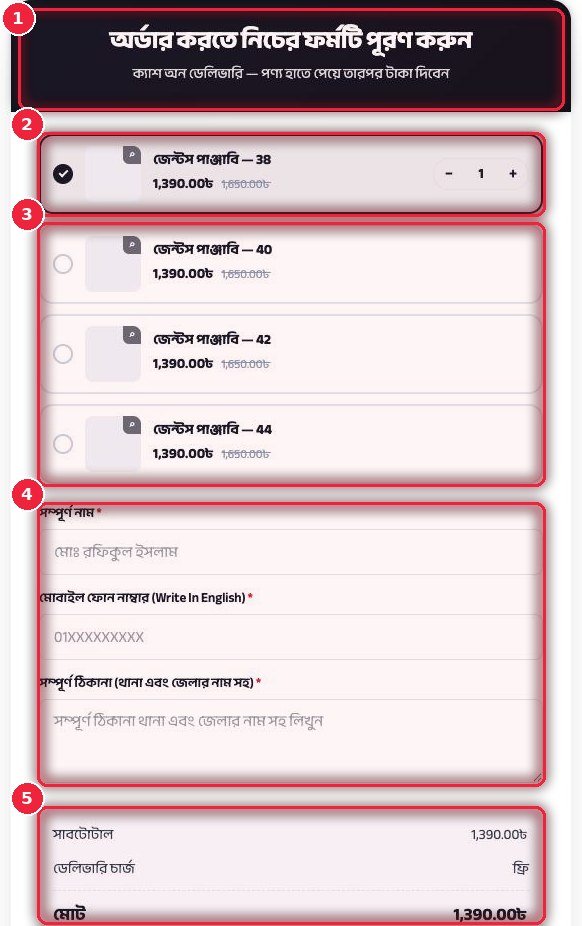
- 1Title and subtitle Written your way — e.g. “Cash on delivery — pay when you receive the product”.
- 2Selected products Ticked products, price, crossed-out price, and quantity up/down.
- 3Variations Sizes or colors on separate rows — the customer switches in one tap.
- 4Name, mobile, address Only the three fields that matter — the fewer fields, the more orders.
- 5Totals Subtotal, delivery charge and total — update instantly when the product or area changes.
⚙️ Checkout form — products and form text
All form settings are in the Checkout form box under the editor. The form sits at the end of the page automatically; to put it elsewhere, add to the content.
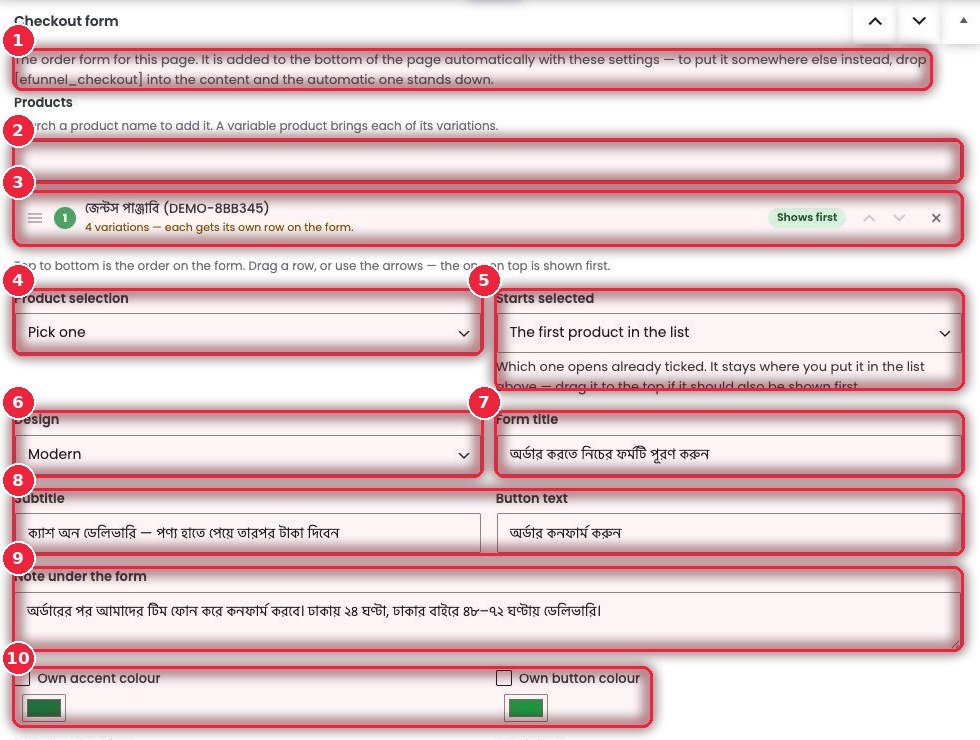
- 1Where it goes Automatically at the end, or anywhere you like with the shortcode.
- 2Products Type a product name to add it — add a variable product and all its variations appear on separate rows.
- 3Product rows Drag or use the arrows to reorder; the top one shows first (Shows first); remove with ✕.
- 4Product selection Pick one (choose one) or Pick several (several, with quantities).
- 5Starts selected Which one is ticked when the page opens.
- 6Design Classic, Modern or Minimal.
- 7Form title The big text at the top of the form.
- 8Subtitle · Button text The line below it and the order button text.
- 9Note under the form A small note below the form — e.g. “Our team will call to confirm after you order”.
- 10Own colors This form’s own accent and button color.
💸 Fields and offers — discounts and free delivery
Which fields to show, and what customers get for spending a certain amount — for this funnel only.
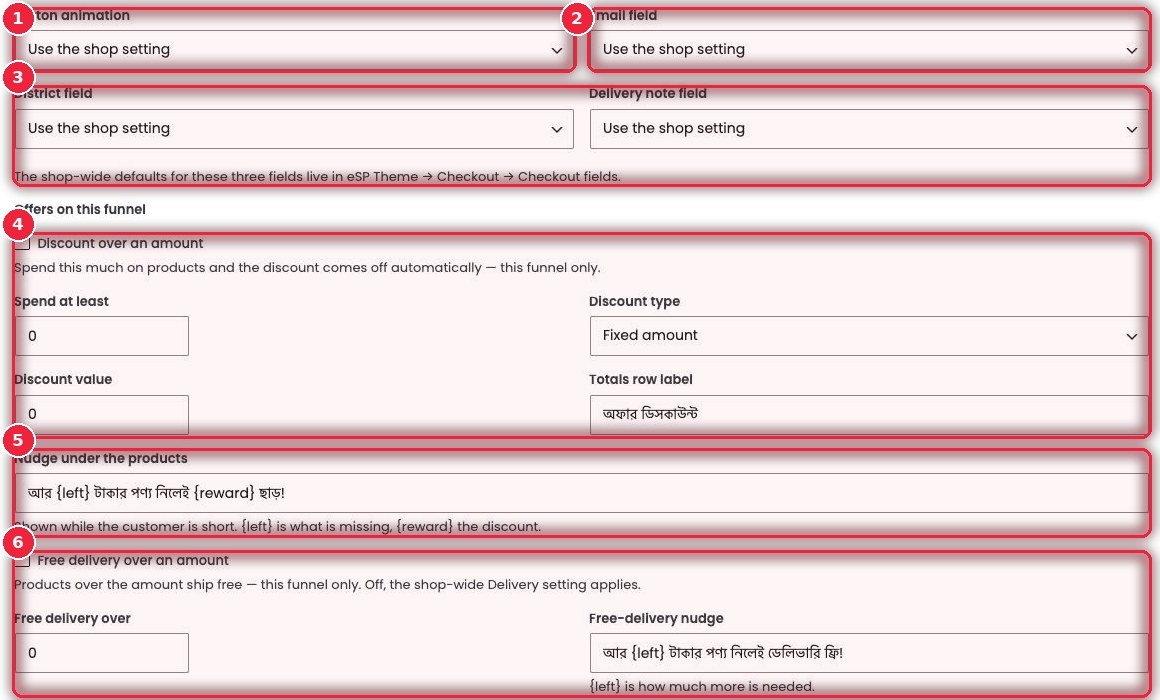
- 1Button animation Pulse, Shine, Bounce or Glow on the order button — to catch the eye.
- 2Email field Whether to show the email field.
- 3District · Delivery note The district and delivery note fields. The shop default is in eSP Theme → Checkout.
- 4Discount over an amount Spend this much, get this much off — deducted automatically. A fixed amount or a percentage.
- 5Nudge under the products “Add {left} taka more and get {reward} off!” — this line shows when the customer is just short.
- 6Free delivery over an amount Free delivery above this amount, with an “add {left} taka more for free delivery” nudge.
➕ Order bump, Quantity deals and Thank-you offer
A little more from the same customer — without an extra delivery charge.
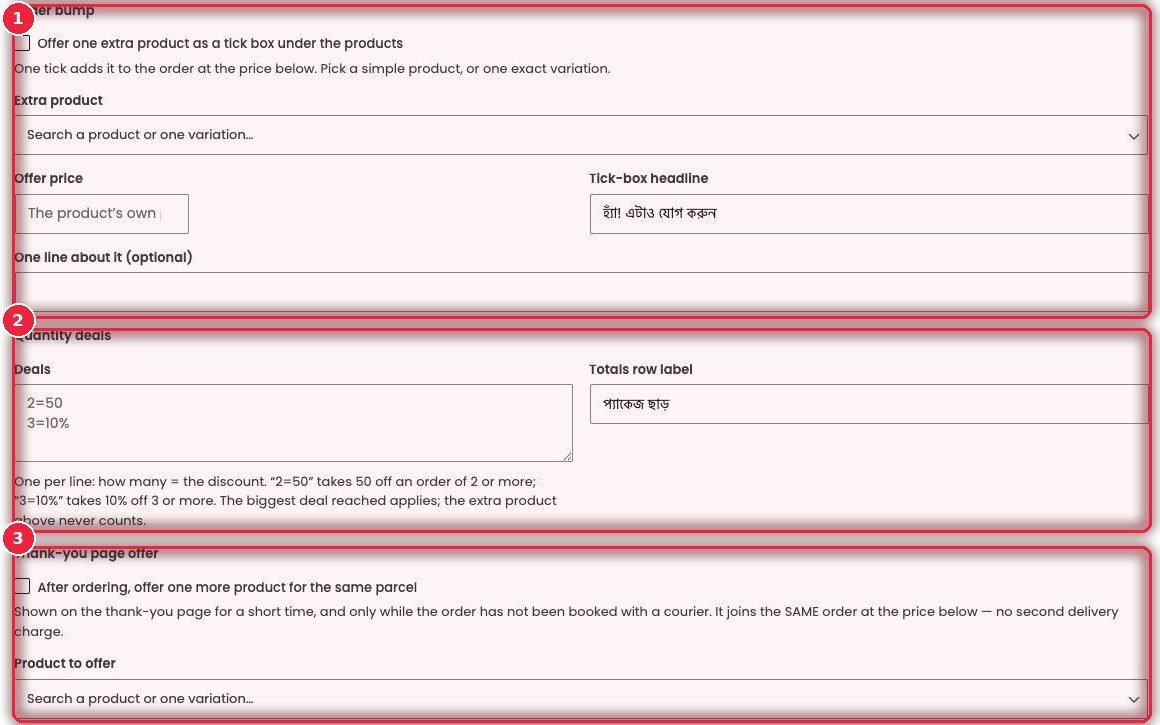
- 1Order bump A tick box under the products — “Yes! Add this too”. One tick adds an extra product to the order at the offer price.
- 2Quantity deals Discounts on multiple pieces — one rule per line: 2=50 means buy 2, get 50 taka off; 3=10% means buy 3, get 10% off. The biggest matching deal applies.
- 3Thank-you page offer An offer for another product on the thank-you page after ordering — it’s added to the same parcel until it’s booked with the courier, so there’s no second delivery charge.
🎁 Thank-you offer timing and surprise discount
Small tricks to encourage people to finish the form.
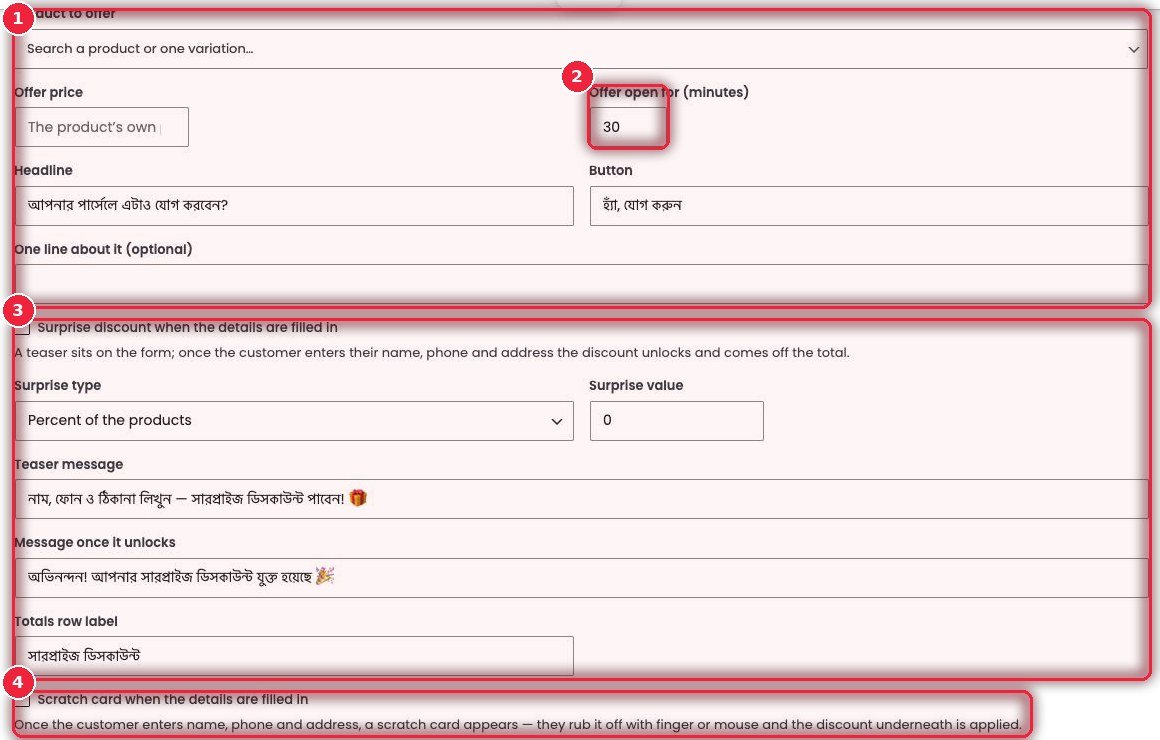
- 1Thank-you offer details Which product, offer price, heading and button text.
- 2Offer open for How many minutes the offer stays open (e.g. 30 minutes).
- 3Surprise discount The form shows a teaser — enter name, phone and address and the discount unlocks and comes off the total. You write the teaser, the unlocked message and the summary line label yourself.
- 4Scratch card After entering details, a scratch card appears — scratch with a finger or mouse to reveal the discount, which is added to the order.
🎟️ Scratch card settings and coupons
How much the scratch card gives, and how coupons work.
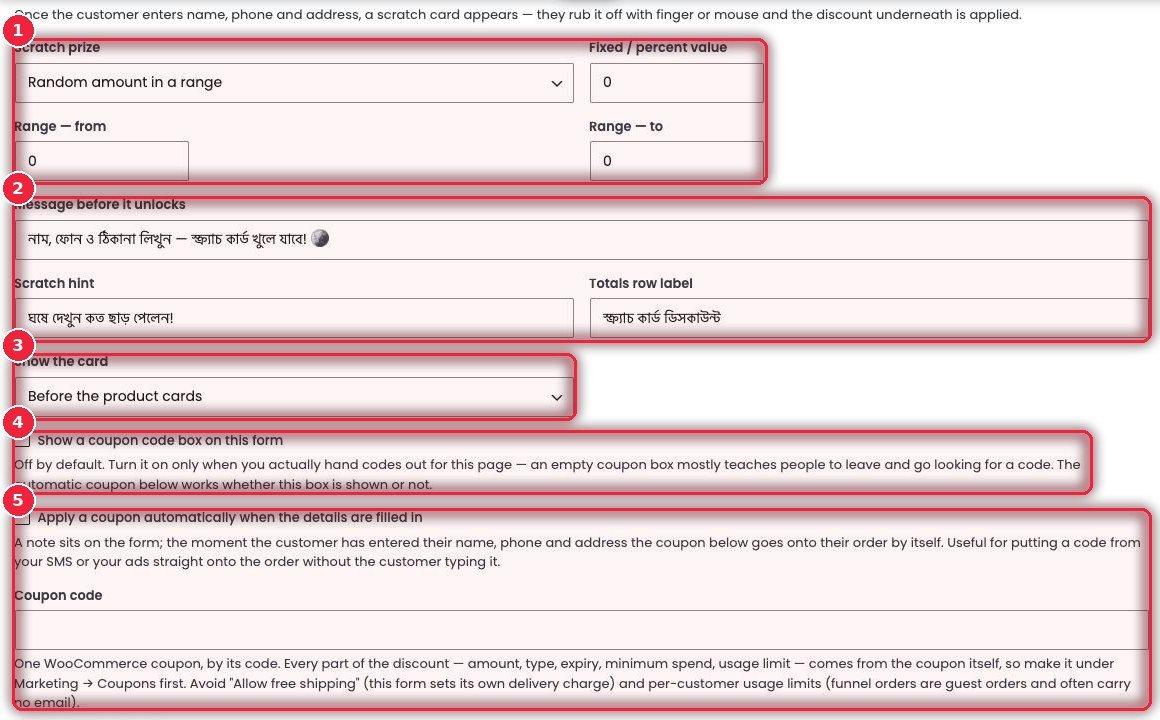
- 1Scratch prize A fixed amount, a percentage, or a random amount within a range (e.g. 20–80).
- 2Messages The text before it’s revealed, the scratch hint and the summary line label.
- 3Show the card Where the card appears — before the products, before the form fields, or after them.
- 4Coupon code box Off by default. Only turn it on when you’re really handing out codes — an empty coupon box makes many people leave the page to hunt for a code.
- 5Auto coupon The coupon is applied to the order automatically as soon as details are entered — customers don’t have to type the code from your SMS or ad. Create the coupon first in Marketing → Coupons.
📱 Phone number first, then the rest of the form
At least keep the number of someone who would otherwise leave the page.
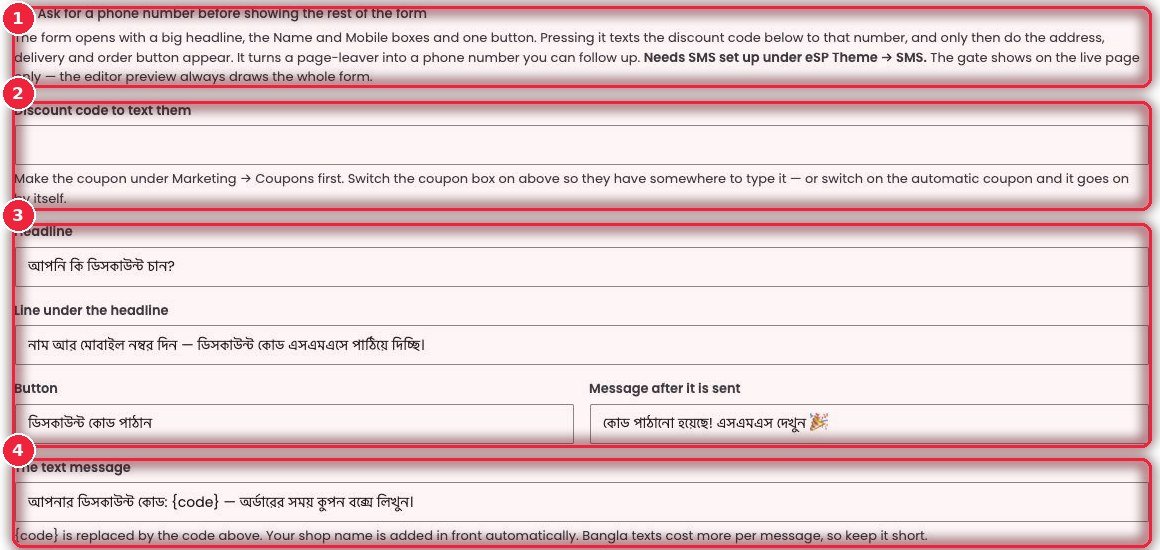
- 1Turn it on The form starts with a big heading, name and mobile fields and one button. Pressing the button sends a discount code by SMS, then the address and order button appear. This needs eSP Theme → SMS set up.
- 2Which code is sent A WooCommerce coupon code.
- 3Text Heading, subtitle, button and the message after sending.
- 4SMS text {code} is replaced with the code automatically, and your shop name goes in front. Bangla SMS costs more, so keep it short.
📡 Separate pixels for this funnel
A different ad account’s or a different client’s pixel — on this funnel only.
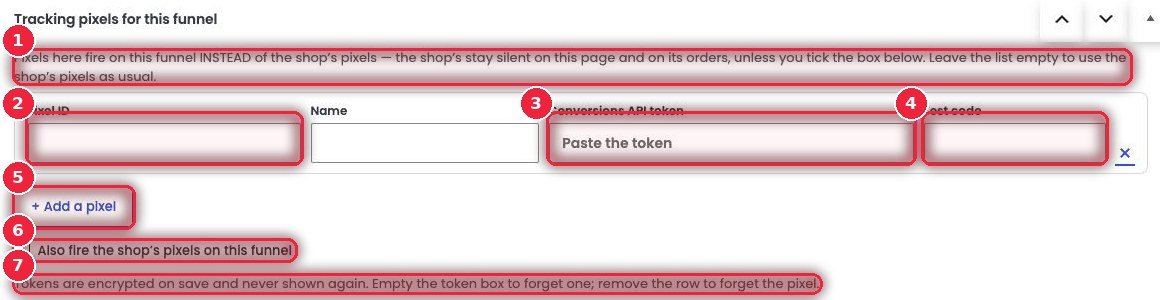
- 1How it works Pixels added here run on this page and its orders instead of the shop’s pixels. Leave it empty and the shop’s pixels run as normal.
- 2Pixel ID Facebook pixel ID and a name to recognize it by.
- 3Conversions API token Token for sending events from the server — events get through even if the browser has an ad blocker.
- 4Test code Code for testing in Events Manager.
- 5+ Add a pixel You can add more than one pixel.
- 6Also fire the shop’s pixels Run the shop’s pixels at the same time if you want.
- 7Security Tokens are encrypted when saved and never shown again.
✨ Design Library — ready designs
Instead of building from scratch, drop in a ready landing page or section, then change it your way.
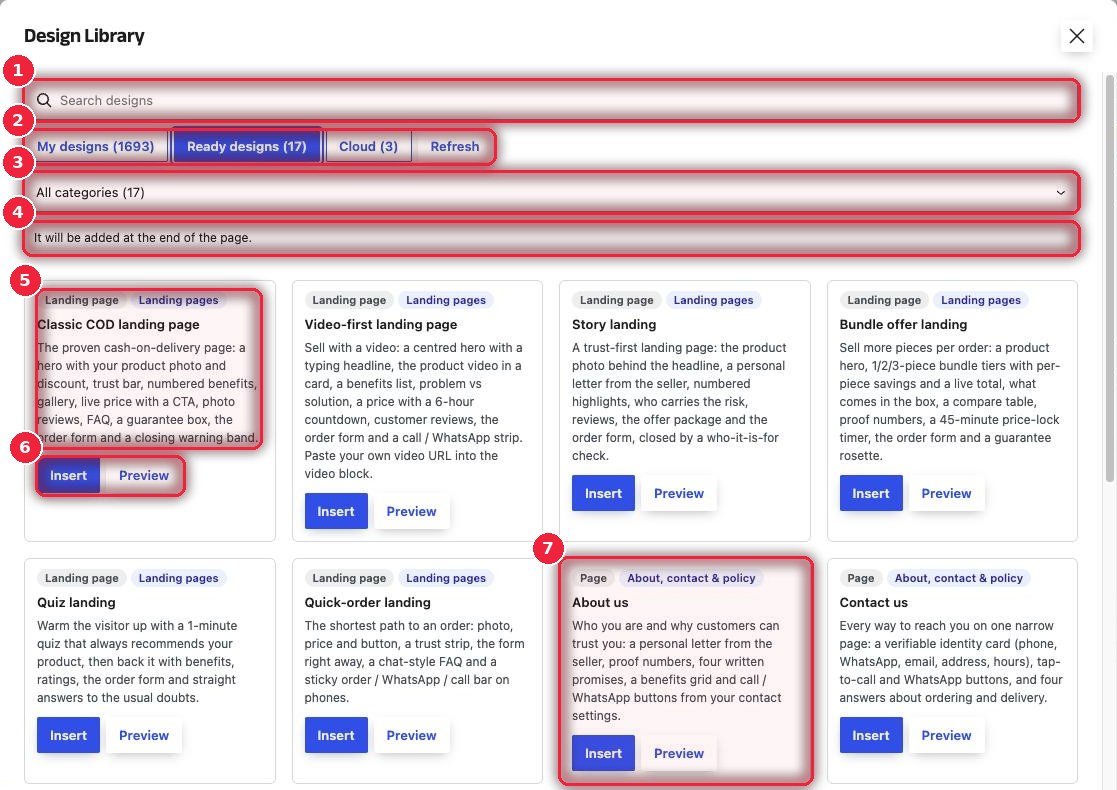
- 1Search By design name.
- 2My designs · Ready designs · Cloud Your own saved designs, designs made by eSalesPage, and designs kept in the cloud.
- 3Categories Hero, Benefits, Trust & guarantee, Reviews, Offers & timers, FAQ, Order steps, Photos & video, Landing pages, Shop & product pages and more.
- 4Where it goes The design is added at the end of the page.
- 5Each design A name and a description of what’s inside — e.g. Classic COD landing page: hero, trust bar, benefits, gallery, reviews, FAQ, guarantee, order form.
- 6Insert · Preview Preview it first, then insert if you like it.
- 7Full pages Essential pages like About us, Contact us and Delivery & returns are ready too.